
Apple Thunderbolt Display
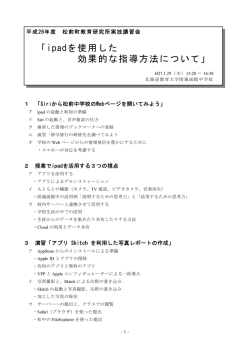
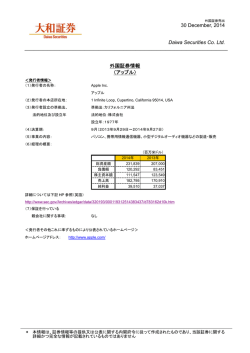
Apple Thunderbolt Display Apple Inc. © 2011 Apple Inc. All rights reserved. Under the copyright laws, this manual may not be copied, in whole or in part, without the written consent of Apple. The Apple logo is a trademark of Apple Inc., registered in the U.S. and other countries. Use of the “keyboard” Apple logo (OptionShift-K) for commercial purposes without the prior written consent of Apple may constitute trademark infringement and unfair competition in violation of federal and state laws. Every effort has been made to ensure that the information in this manual is accurate. Apple is not responsible for printing or clerical errors. Apple 1 Infinite Loop Cupertino, CA 95014 408-996-1010 www.apple.com Apple, the Apple logo, FaceTime, iChat, iMovie, iPhone, iPod, Mac, MacBook, MagSafe, and Photo Booth are trademarks of Apple Inc., registered in the U.S. and other countries. iPad is a trademark of Apple Inc. Apple and Apple Store are service marks of Apple Inc., registered in the U.S. and other countries. ENERGY STAR® is a U.S. registered trademark. The Bluetooth® word mark and logos are registered trademarks owned by Bluetooth SIG, Inc. and any use of such marks by Apple is under license. Thunderbolt and the Thunderbolt logo are trademarks of Intel Corporation in the United States and other countries. Other company and product names mentioned herein may be trademarks of their respective companies. Mention of third-party products is for informational purposes only and constitutes neither an endorsement nor a recommendation. Apple assumes no responsibility with regard to the performance or use of these products. Contents 7 8 10 14 16 17 18 19 Getting Started Setting Up Your Display Using Your Display Care and Safety Ergonomics Troubleshooting Your Display Learning More, Service, and Support Specifications 21 22 24 28 30 31 32 33 はじめに ディスプレイを設定する ディスプレイを使用する 保守と安全性 作業環境 ディスプレイのトラブルに対処する その他の情報、 サービス、 およびサポートについて 仕様 3 35 36 38 42 43 44 45 46 使用入门 安装显示器 使用显示器 保养与安全 人机工程学 显示器故障排除 了解更多信息及服务与支持 技术规格 47 48 50 53 55 56 57 58 使用入門 安裝您的顯示器 使用您的顯示器 維護與安全 人體工學 顯示器的疑難解答 更多內容、服務與支援 技術規格 59 60 62 66 68 시작하기 4 모니터 설치하기 모니터 사용하기 관리와 안전 인체 공학 69 모니터 문제 해결하기 70 더 배우기, 서비스 및 지원 71 제품 사양 73 74 76 80 82 83 84 85 Bantuan Persiapan Mempersiapkan Layar Menggunakan Layar Perawatan dan Keselamatan Ergonomis Mengatasi Masalah Layar Mengetahui Lebih Lanjut, Layanan, dan Dukungan Spesifikasi 87 Regulatory Compliance Information 89 Apple and the Environment 90 環境向上への取り組み 90 Apple 和环境 90 Apple 與環境保護 90 Apple과 환경 90 Apple dan Lingkungan 5 Getting Started Your Apple Thunderbolt Display is designed to work seamlessly with Mac computers that have a Thunderbolt port. It features an LED-backlit widescreen display, a MagSafe connector to charge your MacBook Pro, a built-in FaceTime HD camera, microphone, speaker system, security slot, and ports. The instructions on the following pages help you set up and use your new display. Learn how to:  Connect your display to your computer  Use your display’s camera, microphone, speaker system, and ports  Adjust your display’s settings Note: You can connect your Apple Thunderbolt Display to any Mac computer that has a Thunderbolt port. Important: Carefully read all the installation instructions (and the safety information starting on page 14) before you set up and use your display. For information about the specific computers and graphics cards that are compatible with your display, go to www.apple.com/displays. English 7 Setting Up Your Display Follow these steps to set up your Apple Thunderbolt Display: 1 Remove the protective film from the display and cables. 2 Insert the power cord into the display, and then insert the AC plug into a grounded power outlet. 3 Connect the Thunderbolt cable to your computer’s Thunderbolt port. Apple Thunderbolt Display MacBook Pro MagSafe power port Grounded power outlet Thunderbolt port 4 If you’re connecting to a MacBook Pro, plug the MagSafe connector into the MagSafe power port on your MacBook Pro to power it and charge its battery. 5 If your computer is turned off, press the power (®) button on your computer to start it up. The display turns on automatically when you start up your computer. 8 English Setting Up Your MacBook Pro with the Lid Closed You can close the lid of your MacBook Pro and use just your Apple Thunderbolt Display. Follow the setup instructions on the previous page, and make sure the MagSafe connector from the display is plugged into the MagSafe power port on your MacBook Pro. To use your Apple Thunderbolt Display with your MacBook Pro lid closed: 1 Connect an external USB keyboard and mouse to a USB port on your display, or use the Bluetooth® Setup Assistant to set up a wireless keyboard and mouse. 2 Make sure your MacBook Pro is turned on. 3 Close the lid on your MacBook Pro to put it to sleep. 4 Wait a few seconds, and then press any key on the external keyboard or click the mouse to wake your MacBook Pro. Setting Up Your Apple Thunderbolt Display as an Additional Display When you leave the lid on your MacBook Pro open, you can mirror the same desktop image on both displays or use the additional display as an extension of your desktop. Use Displays preferences to set up video mirroring or extended desktop. To set up video mirroring or extended desktop: 1 Choose Apple () > System Preferences, and then click Displays. 2 Click the Arrangement tab and follow the onscreen instructions. English 9 Using Your Display Your Apple Thunderbolt Display has a built-in FaceTime HD camera, microphone, and speaker system. Microphone Built-in FaceTime HD camera Speaker system Using the Built-in FaceTime HD Camera and Microphone You can use the built-in FaceTime HD camera and microphone to capture still images, video, and sound using applications such as FaceTime, iChat, iMovie, and Photo Booth. To set up the camera and microphone with iChat: 1 Click the iChat icon in the Dock to open the iChat application. 2 Choose iChat > Preferences, and then click Audio/Video. 3 Choose FaceTime HD Camera (Display) from the Camera pop-up menu. 4 Choose Display Audio from the Microphone pop-up menu. 10 English Setting Up Sound Input and Output You can listen to music, movies, games, and multimedia files through the speaker system on your display. You can use the microphone to record sounds or talk with friends using iChat or FaceTime. Use Sound preferences to manage sound input and output. To set up sound input: 1 Choose Apple () > System Preferences, and then click Sound. 2 Click the Input tab in Sound preferences. 3 Choose Display Audio to input sound through your display’s microphone. To set up sound output: 1 Choose Apple () > System Preferences, and then click Sound. 2 Click the Output tab in Sound preferences. 3 Choose Display Audio to hear sound through your display’s speaker system. These sound settings are used whenever your display is connected to your computer. They remain in effect until you change them. Adjusting the Resolution, Brightness, and Color Your Apple Thunderbolt Display can automatically adjust the screen brightness for current light conditions using the built-in ambient light sensor. You can turn autobrightness on or off in Displays preferences. To change the resolution or brightness: 1 Choose Apple () > System Preferences, and then click Displays. 2 Choose a resolution or drag the Brightness slider. English 11 You can also use the brightness keys on an external Apple Keyboard to increase ( ) or decrease ( ) the brightness of your display. Make sure the menu bar is on the display you want to adjust. To change the display color profile or calibrate your display: 1 Click the Color tab in Displays preferences. 2 Choose a display color profile, or click Calibrate to open the Display Calibrator Assistant. For more information about calibrating your display, choose Help > Mac Help in the menu bar and search for “calibrate.” Security Slot and Ports Gigabit Ethernet port Thunderbolt port USB 2.0 ports (3) Security slot FireWire 800 port To secure your display, attach a locking cable to the security slot. 12 English G Gigabit Ethernet port (10/100/1000Base-T) Connect to a high-speed 10/100/1000Base-T Ethernet network, connect a DSL or cable modem, or connect to another computer and transfer files. The Ethernet port automatically detects other Ethernet devices. Thunderbolt port (high-speed data, video, and audio) Connect Thunderbolt-compatible devices for high-speed data transfer, or connect another display that uses Thunderbolt. This Thunderbolt port is not compatible with DVI, VGA, or DisplayPort displays or adapters. d Three high-speed USB (Universal Serial Bus) 2.0 ports Connect an iPod, iPhone, iPad, mouse, keyboard, printer, disk drive, digital camera, joystick, external USB modem, and more. You can also connect USB 1.1 devices. H FireWire 800 port Connect external devices, such as digital video cameras and storage devices. The port provides up to 7 watts of power. Important: You can use the USB ports to charge your iPad, iPhone, or iPod, even when your display isn’t connected to a computer. If you use one of these ports to sync information between your computer and an iPad, iPhone, or iPod, make sure the display’s Thunderbolt cable is connected to your computer’s Thunderbolt port. Using a VESA Mounting Solution with Your Display You can attach your display to an alternative mounting solution, using the VESA Mount Adapter Kit available from the Apple Online Store at . Use the kit to attach your display to any available VESA-compatible mounting solution. Simply follow the instructions included with the kit. English 13 Care and Safety Before you lift or reposition your display, you may need to disconnect the cables and power cord. Use correct lifting techniques when positioning the display. When lifting or carrying the display, hold it by the edges. Don’t lift the display by the stand or the cord. To clean the screen on your display: 1 Disconnect the power cord. 2 Use a soft, dry cloth, to wipe dust from the screen. WARNING: Don’t clean the screen with a cleaner containing alcohol or acetone. Use a cleaner intended for use with a screen or display. Never spray cleaner directly on the screen. It may drip inside the display and cause damage. Don’t operate your display in areas with significant amounts of airborne dust, or smoke from cigarettes, cigars, ashtrays, stoves, or fireplaces, or near an ultrasonic humidifier using unfiltered tap water. Tiny airborne particles produced by smoking, cooking, burning, or using an ultrasonic humidifier with unfiltered water may, in rare instances, enter the ventilation openings of your display and, under certain conditions, result in a slight haze on the inside surface of the glass panel that covers the display. 14 English Follow these safety guidelines for using your display:  The only way to completely disconnect power is to unplug the power cord. Be sure to pull the plug, not the cord.  Disconnect power immediately if the power cord is frayed or damaged, if you spill something on the display, or if the display falls or is damaged in some other way. WARNING: Use only the power cord that came with your display. The power cord has a three-wire grounding plug (a plug that has a third grounding pin) that fits only a grounded AC outlet. If you are unable to insert the plug into an outlet because the outlet is not grounded, contact a licensed electrician to replace the outlet with a properly grounded outlet. WARNING: Your display is a high-voltage component and should not be opened for any reason, even when it’s unplugged. If your display needs service, see “Learning More, Service, and Support” on page 18. English 15 Ergonomics Here are some guidelines for adjusting your display to reduce glare and to accommodate your physical size and shape.  Arrange the display so that the top of the screen is slightly below your eye level when you’re sitting at the keyboard. The best distance from your eyes to the screen is up to you, although most people tend to prefer 18 to 28 inches (45 to 70 cm).  Position the display by tilting it up or down to minimize glare and reflections from overhead lights and nearby windows. Shoulders relaxed Forearms and hands in a straight line Forearms level or tilted slightly Lower back supported 18–28 in. (45–70 cm) Top of the screen at or slightly below eye level (You may need to adjust the height of your display by raising or lowering your work surface) Screen positioned to avoid reflected glare Clearance under work surface Feet flat on the floor or on a footrest Thighs tilted slightly For more information about health, safety, and maintenance, go to the Apple ergonomic website at www.apple.com/about/ergonomics. 16 English Troubleshooting Your Display Before performing any of these steps, make sure your computer is turned on, the display is plugged into a grounded power outlet, all the cables are connected properly to your computer and display, and your computer is not in sleep mode. If the screen doesn’t have an image:  Check the cables and connectors again to make sure they are connected properly to your computer and the display.  Make sure your computer is turned on and is not in sleep mode. If the lid on your MacBook Pro is closed, use the external keyboard or mouse to wake the MacBook Pro from sleep.  Unplug the display’s power cord from the grounded power outlet, wait a few minutes, then plug it in again.  Reset the PRAM by restarting your computer while holding down the Command (x), Option, P, and R keys until you hear the startup sound a second time. If the screen is dim:  Make sure the display brightness is set properly. Choose Apple () > System Preferences and click Displays. Drag the Brightness slider to adjust the brightness.  If the colors on the display are too saturated or not correct, you may need to calibrate your display. Open Displays preferences, click the Color tab, click Calibrate, and follow the instructions. If your MacBook Pro isn’t charging: Make sure the MagSafe connector from your display is seated properly in the MagSafe power port on your MacBook Pro. English 17 If the built-in FaceTime HD camera, microphone, speaker system, or ports on the display aren’t working: Make sure the Thunderbolt cable from the display is firmly plugged into the Thunderbolt port on your computer. The display’s camera, microphone, speaker system, and ports work only when this cable is connected to your computer. More Troubleshooting Information You can find more troubleshooting information on the Displays support website at www.apple.com/support/displays. Learning More, Service, and Support You can find more information about your display on the Apple website and in Mac Help. 18 To learn about See Using your display Mac Help and search for “displays.” Display service, support, discussions, troubleshooting, and software downloads The Displays Support site at www.apple.com/support/displays. The latest information about displays The Apple Displays site at www.apple.com/displays. Registering your display The Apple Product Registration site at www.apple.com/register. English Specifications  Model number: A1407  Resolution: 2560 x 1440 @ 60 Hz  Ports: • Three high-speed USB 2.0 ports • One Gigabit Ethernet port • One Thunderbolt port • One FireWire 800 port  Camera and microphone: Built-in FaceTime HD camera with microphone  Speakers: Built-in 2.1 speakers with 49 W output Dimensions:  Weight: 23.5 lb. (10.7 kg)  Height: 19.2 inches (488.1 mm)  Width: 25.65 inches (651.7 mm)  Depth (with stand): 8.2 inches (208.13 mm)s  Viewable: 27 inches (685.8 mm) diagonal Operating environment:  Operating temperature: 50° to 95° F (10° to 35° C)  Relative humidity: 20% to 80% (noncondensing)  Altitude: 0 to 10,000 feet (0 to 3048 meters) English 19 はじめに お求めの Apple Thunderbolt Display は、 Thunderbolt ポートを搭 載した Mac コンピュータとスムーズに連動するように設計されています。 このディスプレイには、LED バックライト・ワイドスクリーン・ディスプレイ、 MacBook Pro を充電するための MagSafe コネクタ、内蔵 FaceTime HD カメラ、 マイク、 スピーカーシステム、 セキュリティスロット、 およびポートが搭 載されています。 お求めのディスプレイを設定および使用することが 以下のページに記載されている指示に従って、 できます。 次の情報が記載されています:  ディスプレイをコンピュータに接続する  ディスプレイのカメラ、マイク、スピーカーシステム、およびポートを使用する  ディスプレイの設定を調整する 参考: Apple Thunderbolt Display は、Thunderbolt ポートを装備した Mac コンピュータに接続す ることができます。 (および 28 ページ以降の安全性 設定に関するすべての指示 重要: ディスプレイを設定して使用する前に、 に関する情報) をお読みください。 お求めのディスプレイと互換性のあるコンピュータおよびグラフィックカードについては、 www.apple.com/jp/displays を参照してください。 日本語 21 ディスプレイを設定する Apple Thunderbolt Display を設定するときは、以下の手順に従って進めてください: 1 ディスプレイおよびケーブルから保護用のフィルムをすべて外します。 2 ディスプレイに電源コードを接続してから、アース付き電源コンセントに AC プラグを差し込みます。 3 Thunderbolt ケーブルをお使いのコンピュータの Thunderbolt ポートに接続します。 Apple Thunderbolt Display アース付き 電源コンセント MacBook Pro MagSafe 電源ポート Thunderbolt ポート 4 MacBook Pro に接続する場合は、電力の供給とバッテリーの充電のために、MagSafe コネクタを MacBook Pro の MagSafe 電源ポートに差し込みます。 5 コンピュータの電源が入っていない場合は、コンピュータのパワー(®)ボタンを押してコンピュータを起 コンピュータを起動すると、 動します。 自動的にディスプレイの電源が入ります。 22 日本語 ディスプレイを閉じて MacBookPro を使用するように設定する MacBook Pro のディスプレイを閉じて、Apple Thunderbolt Display だけを使用することができ Pro の MagSafe 電源ポートに差し込まれていることを確認してください。 ます。前のページの手順に従って設定を行い、 ディスプレイの MagSafe コネクタが MacBook MacBook Pro のディスプレイを閉じたまま Apple Thunderbolt Display を使用するには: 「Bluetooth® 設定アシスタ 1 ディスプレイの USB ポートに外部 USB キーボードとマウスを接続するか、 ント」を使ってワイヤレスキーボードとマウスを設定します。 2 MacBook Pro の電源が入っていることを確認します。 3 MacBook Pro のディスプレイを閉じてスリープ状態にします。 4 数秒間待ってから、外部キーボードのいずれかのキーを押すかマウスをクリックして、MacBook Pro の スリープを解除します。 AppleThunderboltDisplay を追加のディスプレイとして設定する MacBook Pro のディスプレイを開いたまま使用するときは、両方のディスプレイに同じデスクトップ画像 を表示する (ミラーリングする) か、 (拡張する) ことができ 追加のディスプレイを使ってデスクトップを広げる ます。 ビデオミラーリングまたは拡張デスクトップを設定するには、 「ディスプレイ」環境設定を使用します。 ビデオミラーリングまたは拡張デスクトップを設定するには: 「ディスプレイ」をクリックします。 1 アップル()メニュー>システム環境設定と選択して、 2 「調整」タブをクリックして、画面に表示される指示に従います。 日本語 23 ディスプレイを使用する お求めの Apple Thunderbolt Display には、内蔵 FaceTime HD カメラ、マイク、およびスピーカー システムが搭載されています。 マイク 内蔵 FaceTime HD カメラ スピーカーシステム 内蔵 FaceTimeHD カメラとマイクを使用する 内蔵 FaceTime 「FaceTime」、 「iChat」、 「iMovie」、 「Photo Booth」な HD カメラとマイクを使って、 どのアプリケーションで静止画像やビデオを撮影し、 音声を録音できます。 「iChat」でカメラとマイクを設定するには: 1 「Dock」にある「iChat」のアイコンをクリックして「iChat」アプリケーションを開きます。 「オーディオ/ビデオ」をクリックします。 2 「iChat」>「環境設定」と選択して、 3 「カメラ」ポップアップメニューから「FaceTime HD カメラ(ディスプレイ)」を選択します。 4 「マイク」ポップアップメニューから「ディスプレイオーディオ」を選択します。 24 日本語 サウンドの入出力を設定する ムービー、 ゲーム、 およびマルチメディアファイルのサウンドをディスプレイのスピーカーシステムか 音楽、 ら聴くことができます。 マイクを使って音声を録音したり、 「iChat」や「FaceTime」で友人と会話したりす ることもできます。 サウンドの入出力を管理するには、 「サウンド」環境設定を使用します。 サウンド入力を設定するには: 「サウンド」をクリックします。 1 アップル()メニュー>システム環境設定と選択して、 2 「サウンド」環境設定の「入力」タブをクリックします。 「ディスプレイオーディオ」を選択します。 3 ディスプレイのマイクからサウンドを入力するときは、 サウンド出力を設定するには: 「サウンド」をクリックします。 1 アップル()メニュー>システム環境設定と選択して、 2 「サウンド」環境設定の「出力」タブをクリックします。 「ディスプレイオーディオ」を 3 ディスプレイのスピーカーシステムからサウンドを出力するときは、 選択します。 ディスプレイをコンピュータに接続しているときは、 常にこれらのサウンド設定が使用されます。手動で変 更しない限り設定は維持されます。 および色を調節する 解像度、輝度、 お求めの Apple Thunderbolt Display では、内蔵の環境光センサーを使用して、現在の照明条件に応 じて画面の輝度を自動的に調節できます。 「ディスプレイ」環境設定で、 自動輝度調整の入と切を切り替え ることができます。 解像度または輝度を変更するには: 「ディスプレイ」をクリックします。 1 アップル()メニュー>システム環境設定と選択して、 「輝度」スライダをドラッグします。 2 解像度を選択するか、 日本語 25 外付けの Apple Keyboard の輝度調節キーを使って、ディスプレイの輝度を上げたり( )下げたり( ) することもできます。 調節したいディスプレイにメニューバーが表示されていることを確認します。 ディスプレイのカラープロファイルを変更する/ディスプレイを補正するには: 1 「ディスプレイ」環境設定の「カラー」タブをクリックします。 「補正」をクリックして 「ディスプレイキャリブレータ・ア 2 ディスプレイのカラープロファイルを選択するか、 シスタント」を開きます。 と選択して、 「補正」 ディスプレイの補正方法について詳しくは、 メニューバーで 「ヘルプ」>「Mac ヘルプ」 で検索してください。 セキュリティスロットとポート ギガビット Ethernet ポート Thunderbolt ポート USB 2.0 ポート 3 セキュリティスロット FireWire 800 ポート ディスプレイを盗難から守るには、 セキュリティスロットに盗難防止用ケーブルを接続します。 26 日本語 G ギガビット Ethernet ポート (10/100/1000Base-T) 高速 10/100/1000Base-T Ethernet ネットワークに接続するか、 DSL またはケーブルモデムを接続するか、 別のコンピュータに接続してファイルを転送します。 他の Ethernet デバイスが自動的に検出されます。 Thunderbolt ポート(高速データ、ビデオ、およびオーディオ) 高速データ転送用の Thunderbolt 互換装置を接続するか、Thunderbolt を使用する別のディスプレイ を接続します。 この Thunderbolt ポートは、DVI、 VGA、DisplayPort ディスプレイまたはアダプタとは互 換性がありません。 d H (Universal Serial Bus)2.0 ポート×3 高速 USB iPod、iPhone、iPad、マウス、キーボード、プリンタ、ディスクドライブ、デジタルカメラ、ジョイスティック、外 付け USB モデムなどを接続します。USB 1.1 装置も接続できます。 FireWire 800 ポート デジタルビデオカメラや記憶装置などの外付け装置を接続します。 このポートは最大 7 ワットの電力を供 給します。 お使い 重要: お求めのディスプレイがコンピュータに接続されていないときでも、USB ポートを使って、 の iPad、 iPhone、または iPod を充電できます。これらのポートのいずれかを使って、お使いのコンピュー または iPod の間で情報を同期する場合は、 ディスプレイの Thunderbolt ケーブ タと iPad、iPhone、 ルがお使いのコンピュータの Thunderbolt ポートに接続されていることを確認します。 VESA マウントを使用してディスプレイを設置する オンラインの Apple Store(www.apple.com/jp/store)から購入できる VESA マウントアダプタキッ トを使って、 ディスプレイを別の設置台に取り付けることができます。VESA 対応の設置台にディスプレイ を取り付けるときには、常にこのキットを使用します。 キットに付いている指示書に従うだけで、簡単に取 り付けられます。 日本語 27 保守と安全性 ディスプレイを持ち上げたり位置を変えたりするときには、 その前にケーブルと電源コードを抜くようにし てください。 ディスプレイの位置を変えるときは、 ディスプレイを持ち 正しい方法で持ち上げてください。 ディスプレイの端を持ってください。 スタンドやコードをつかんでディスプ 上げたり運んだりする場合は、 レイを持ち上げないでください。 ディスプレイの画面を清掃するには: 1 電源コードを抜きます。 2 柔らかい乾いた布で画面のほこりをふき取ります。 アルコールやアセトンを含んだクリーナーで清掃しないでください。画面またはディス 警告: 画面は、 プレイ用のクリーナーを使用してください。画面にクリーナーを直接スプレーしないでください。 クリー ナーがディスプレイ内部に入り込み、 損傷の原因になる可能性があります。 ディスプレイは、 ほこりが多く浮遊する場所や、 タバコ、葉巻、灰皿、 ストーブ、 暖炉からの煙のある場所、 また 蒸留してない水道水を使用する超音波式加湿器のそばで操作しないでください。喫煙、調理、燃焼、 は蒸留していない水道水を使った超音波式加湿器の使用によって発生する微細な浮遊物がまれにディス プレイの通気口に入り、 状況によってディスプレイを覆うガラスパネルの内部表面がわずかに曇ることが あります。 28 日本語 ディスプレイを使用するときは、安全性に関する以下のガイドラインに従ってください:  電源を完全に切る唯一の方法は、電源コードを抜くことです。必ず、コードではなくプラグを持って抜い てください。  電源コードがすり切れたり損傷したりした場合、ディスプレイに液体がこぼれた場合、またはディスプレ イが落ちるなどして壊れた場合は、ただちに電源コードを抜いてください。 警告: ディスプレイに付属の電源コードだけを使用してください。AC 電源コードのプラグはアース線 アース端子付きの AC コンセントだけで使用できます。 コンセントにアース端子が 付きの 3P プラグで、 付いていないためにプラグをコンセントに差し込むことができない場合は、電器店に相談して適切な コンセントに変えてください。 どのような理由が 警告: ディスプレイは高電圧部品なので、電源に接続されていない場合を含めて、 サービス、 あっても開かないでください。 ディスプレイの修理が必要な場合は、 32 ページの「 その他の情報、 およびサポートについて」を参照してください。 日本語 29 作業環境 ここでは、 コンピュータを使う場所で、 画面が見やすくなるように照明を調節したりディスプレイを各自の 身体に合わせて調節したりするためのポイントを紹介します。  ディスプレイは、キーボードの前に座ったときに画面の上端が目の高さかそれよりもやや低くなるよう に設置しましょう。 目から画面までの距離は各自で決めてかまいませんが、45 ∼ 70 cm 程度の間隔を 取るのが一般的です。  ディスプレイは、画面の角度を上下方向に調節して、窓の明かりや照明などが反射しないように しましょう。 および保守について詳しくは、作業環境に関する Apple の Web サイト 健康、安全性、 を参照してください。 (www.apple.com/about/ergonomics) 30 日本語 ディスプレイのトラブルに対処する コンピュータの電源が入っていること、 ディスプレイの電源コードが接地さ 以下の手順を実行する前に、 れたコンセントに差し込まれていること、 すべてのケーブルがコンピュータおよびディスプレイに正しく接 およびコンピュータがスリープモードになっていないことを確認してください。 続されていること、 画面に画像が表示されない場合:  ケーブルおよびコネクタがコンピュータとディスプレイに正しく接続されていることをもう一度確認 します。  コンピュータの電源が入っていて、スリープモードになっていないことを確認します。MacBook Pro の ディスプレイが閉じている場合は、外部キーボードまたはマウスを使って MacBook Pro のスリープを 解除します。  ディスプレイの電源コードを接地された電源コンセントから抜き、数分間待ってから差し込み直します。  Command(x)キー、Option キー、P キー、および R キーを押しながらコンピュータを再起動し、起 動音が 2 回鳴るまでこれらのキーを押したままにして、PRAM をリセットします。 画面が薄暗い場合:  ディスプレイの輝度が正しく設定されていることを確認します。アップル() メニュー>「システム環境 と選択し、 「ディスプレイ」をクリックします。 「輝度」スライダをドラッグして、輝度を調節します。 設定」  ディスプレイの色がぼやけたり正しくなかったりする場合は、ディスプレイを補正してみます。 「ディスプ レイ」環境設定を開き、 「カラー」タブをクリックして、 「補正」をクリックしてから、画面に表示される指示 に従います。 MacBook Pro が充電されない場合: ディスプレイの MagSafe コネクタが MacBook Pro の MagSafe 電源ポートにしっかりと差し込まれ ていることを確認します。 日本語 31 ディスプレイの内蔵 FaceTime HD カメラ、 マイク、 スピーカーシステム、 またはポートが機能しない場合: ディスプレイの Thunderbolt ケーブルがコンピュータの Thunderbolt ポートにしっかりと接続されて いることを確認します。 ディスプレイのカメラ、 マイク、 スピーカーシステム、 およびポートは、 このケーブル がコンピュータに接続されているときにのみ機能します。 トラブルへの対処方法に関するその他の情報 トラブルへの対処方法に関するその他の情報は、 ディスプレイのサポート Web サイト で参照できます。 (www.apple.com/jp/support/displays) その他の情報、 サービス、 およびサポートについて ディスプレイについての詳細情報は、Apple の Web サイトおよび「Mac ヘルプ」で参照できます。 知りたいこと ディスプレイを使用する ディスプレイに関するサービス、 サポート、 ディスカッション、 トラブル 参照先 「Macヘルプ」で「ディスプレイ」を検索してください。 ディスプレイサポートのWebサイト (www.apple.com/jp/support/displays) を参照してください。 シューティング、 およびソフトウェア ダウンロード ディスプレイに関する最新情報 AppleのディスプレイのWebサイト(www.apple.com/jp/displays)を参 照してください。 ディスプレイを登録する Appleの製品登録のWebサイト(www.apple.com/jp/register)を参照し てください。 32 日本語 仕様  モデル番号:A1407  解像度:2560×1440、60 Hz( ヘルツ)  ポート: • 高速 USB 2.0 ポート ×3 • 1 ギガビット Ethernet ポート • Thunderbolt ポート ×1 • FireWire 800 ポート ×1  カメラとマイク:内蔵 FaceTime HD カメラとマイク  スピーカー:内蔵 2.1 チャンネルスピーカー(出力 49 W) サイズと重量:  重量:10.7 kg(23.5 ポンド)  高さ:488.1 mm(19.2 インチ)  幅:651.7 mm(25.65 インチ)  奥行き(スタンドを含む) (8.2 インチ) :208.13 mm  対角表示可能サイズ:27 インチ(685.8 mm) 動作環境:  動作時温度:10°C ∼ 35°C(50°F ∼ 95°F)  相対湿度:20%∼ 80%(結露しないこと)  高度:0 ∼ 3048 メートル(0 ∼ 10,000 フィート) 日本語 33 使用入门 AppleThunderboltDisplay显示器被设计成能与具有Thunderbolt 端口的Mac电脑完美地配合使用。它包括LED背光宽屏幕显示屏、给 MacBookPro充电的MagSafe插头,以及内建的FaceTimeHD摄像 头、麦克风、扬声器系统、防盗锁口和端口。 以下页面中的说明能够帮助您安装并使用新显示器。了解如何执行以下操作:  将显示器连接到电脑  使用显示器的摄像头、麦克风、扬声器系统和端口  调整显示器的设置 【注】可以将 Apple Thunderbolt Display 显示器连接到任何具有 Thunderbolt 端口的 Mac 电脑。 【重要事项】在安装并使用显示器之前,请仔细阅读所有安装说明(以及从第 42 页开始的安全性 信息)。 有关与显示器兼容的特定电脑和图形卡的信息,请访问 www.apple.com.cn/displays。 简体中文 35 安装显示器 请按照这些步骤来安装 Apple Thunderbolt Display 显示器: 1 揭去显示器和电缆上的保护膜。 2 将电源线插入显示器,然后将交流插头插入已接地的电源插座。 3 将 Thunderbolt 电缆连接到电脑的 Thunderbolt 端口。 Apple Thunderbolt Display MacBook Pro MagSafe تᅙ٬ आت؛ᅙԎኸ Thunderbolt ٬ 4 如果要连接到 MacBook Pro,请将 MagSafe 插头插入 MacBook Pro 上的 MagSafe 电源端口, 给 MacBook Pro 供电以及给电池充电。 5 如果电脑已关机,请按下电脑上的电源按钮 (®) 以启动电脑。启动电脑时,显示器会自动开启。 在显示屏已合上的情况下设置MacBookPro 可以合上 MacBook Pro 的显示屏,仅使用 Apple Thunderbolt Display 显示器。请按照上一 页中的安装说明来连接显示器,并确定显示器的 MagSafe 插头已插入了 MacBook Pro 上的 MagSafe 电源端口。 36 简体中文 若要在 MacBook Pro 显示屏已合上的情况下使用 Apple Thunderbolt Display 显示器: 1 将外置 USB 键盘和鼠标连接到显示器上的 USB 端口,或者使用“Bluetooth® 设置助理”来设置 无线键盘和无线鼠标。 2 请确定 MacBook Pro 已开启。 3 合上 MacBook Pro 显示屏,将 MacBook Pro 置入睡眠状态。 4 等待几秒钟,然后按下外置键盘上的任何按键或者点按鼠标来唤醒 MacBook Pro。 将AppleThunderboltDisplay显示器设置为附加显示器 如果将 MacBook Pro 显示屏保持为打开状态,则可以让相同的桌面画面在两个显示器上镜像显 示,或者使用附加显示器来扩展您的桌面。使用“显示器”偏好设置来设置视频镜像或扩展桌面。 若要设置视频镜像或扩展桌面: 1 选取苹果菜单 () >“系统偏好设置”,然后点按“显示器”。 2 点按“排列”标签,然后按照屏幕指示进行操作。 简体中文 37 使用显示器 Apple Thunderbolt Display 显示器配有内建的 FaceTime HD 摄像头、麦克风和扬声器系统。 ૼۦ டࣛ FaceTime HD ൾ࿀໊ ၺඔ౸྄ໆ 使用内建的FaceTimeHD摄像头和麦克风 可以通过应用程序(如 FaceTime、iChat、iMovie 和 Photo Booth)使用内建的 FaceTime HD 摄像头和麦克风来捕捉静止图像、视频和声音。 若要设置摄像头和麦克风以配合 iChat 使用: 1 在 Dock 中点按 iChat 图标以打开 iChat 应用程序。 2 选取“iChat”>“偏好设置”,然后点按“音频/视频”。 3 从“摄像头”弹出式菜单中选取“FaceTime HD 摄像头(显示器)”。 4 从“麦克风”弹出式菜单中选取“显示器音频”。 38 简体中文 设置声音输入和输出 可以通过显示器上的扬声器系统来听音乐,以及听影片、游戏和多媒体文件中的声音。可以使用麦 克风来录音,或者通过 iChat 或 FaceTime 与朋友聊天。请使用“声音”偏好设置来管理声音输 入和输出。 若要设置声音输入: 1 选取苹果菜单 () >“系统偏好设置”,然后点按“声音”。 2 在“声音”偏好设置中点按“输入”标签。 3 选取“显示器音频”来通过显示器的麦克风输入声音。 若要设置声音输出: 1 选取苹果菜单 () >“系统偏好设置”,然后点按“声音”。 2 在“声音”偏好设置中点按“输出”标签。 3 选取“显示器音频”以通过显示器的扬声器系统听声音。 只要显示器连接在电脑上,系统就会使用这些声音设置。这些设置会一直有效,直到您更改它们。 调整分辨率、亮度和颜色 通过使用内建的环境光感应器,Apple Thunderbolt Display 显示器可以自动调整屏幕亮度以适 合当前光照条件。可以在“显示器”偏好设置中打开或关闭自动亮度调节。 若要更改分辨率或亮度: 1 选取苹果菜单 () >“系统偏好设置”,然后点按“显示器”。 2 选取一种分辨率或拖移“亮度”滑块。 还可以使用外置 Apple Keyboard 键盘上的亮度键来增大 ( ) 或减小 ( ) 显示器的亮度。确定菜 单栏是在您想要调整的显示器上。 简体中文 39 若要更改显示器颜色描述文件或者校准显示器: 1 在“显示器”偏好设置中点按“颜色”标签。 2 选取一个显示器颜色描述文件,或者点按“校准”以打开“显示器校准程序助理”。 有关校准显示器的更多信息,请在菜单栏中选取“帮助”>“Mac 帮助”,然后搜索“校准”。 防盗锁口和端口 ಆᇚ ༬Ⴝ་ ٬ Thunderbolt ٬ USB 2.0 ٬ĥݓĦ ڿ๏ FireWire 800 ٬ 若要确保显示器的安全,请将防盗锁链连接在防盗锁口上。 40 简体中文 G 千兆位以太网端口 (10/100/1000Base-T) 连接到高速 10/100/1000Base-T 以太网络、连接 DSL 调制解调器或线缆调制解调器,或者连接到 另一台电脑并传输文件。以太网端口会自动检测其他以太网设备。 Thunderbolt 端口(高速数据、视频和音频) 连接兼容 Thunderbolt 的设备用于高速数据传输,或者连接另一台使用 Thunderbolt 的显示器。 此 Thunderbolt 端口与 DVI、VGA 或 DisplayPort 显示器或适配器不兼容。 d 三个高速 USB(通用串行总线)2.0 端口 连接 iPod、iPhone、iPad、鼠标、键盘、打印机、磁盘驱动器、数码相机、游戏杆、外置 USB 调 制解调器等等。还可以连接 USB 1.1 设备。 H FireWire 800 端口 连接外部设备,如数码摄像机和储存设备。端口提供最大 7 瓦电源。 【重要事项】即使显示器没有连接到电脑,您也可以使用这些 USB 端口给 iPad、iPhone 或 iPod 充电。如果使用其中一个端口在电脑和 iPad、iPhone 或 iPod 之间同步信息,请确定显示器的 Thunderbolt 电缆已连接在电脑的 Thunderbolt 端口上。 配合显示器使用VESA安装支架 可以使用 VESA Mount Adapter Kit 套件(可从 Apple Store 在线商店购买,网址 为:www.apple.com.cn/store)将显示器连接到备用的安装支架上。使用该套件将显示器固定在 任何可用的且兼容 VESA 的安装支架上。只需按照该套件附带的说明进行操作即可。 简体中文 41 保养与安全 抬起或重新放置显示器之前,您可能需要拔下电缆和电源线。安放显示器时,请使用正确的方法将 显示器抬起来。抬起或搬移显示器时,请抓住显示器的边缘。切勿通过抓住支架或电源线来抬起显 示器。 若要清洁显示器的屏幕: 1 拔下电源线。 2 使用柔软干燥的擦拭布来擦掉屏幕上的灰尘。 【警告】切勿使用含有酒精或丙酮的清洁剂来清洁屏幕。请使用屏幕或显示器专用的清洁剂。切 勿将清洁剂直接喷射到屏幕上。它可能会渗入显示器内部而导致损坏。 如果所在场所具有大量浮尘,有香烟、雪茄、烟灰缸、火炉或壁炉产生烟尘,或者接近用未经过滤 的自来水对空气进行加湿的超声波加湿器,请勿使用您的显示器。吸烟、烹饪、燃烧或者使用超声 波加湿器用未经过滤的水对空气进行加湿,所产生的尘埃微粒,在极少数情况下可能会进入显示器 的通风口,而且在某些情况下可能会产生轻霾,附着在显示器的玻璃内表面。 请按照这些安全指南使用显示器:  完全切断电源的唯一方法是拔下电源线。务必拔插头,而不要拉电源线。  如果电源线磨损或损坏,显示器上溅有异物、跌落或因为其他原因损坏,请立即切断电源。 【警告】请仅使用显示器附带的电源线。电源线配有一个三相接地插头(其中第三个插脚 接地),它只适合于已接地的交流插座。如果因为插座未接地而不能将插头插入插座,请联系一 位合格的电工,将该插座更换为一个正确接地的插座。 42 简体中文 【警告】显示器是一种高压组件,无论出于什么原因都不要拆开它,即使它没有接上电源。如果 显示器需要维修,请参阅第 45 页“了解更多信息及服务与支持”。 人机工程学 按照以下指南调整您的显示器,以减少刺眼的反光并适合您的身高和体形。  调整显示器,以便您坐在键盘前面时屏幕的顶端稍低于水平视线。显示器与眼睛之间的最佳距离 由您决定,不过大多数人倾向于喜欢 45 至 70 厘米(18 至 28 英寸)的距离。  通过向上或向下倾斜显示器来调整显示器的朝向,以尽可能减少由头顶灯光和附近窗户光线引起 的反光。 简体中文 43 有关保健、安全和维护的更多信息,请访问 Apple 人机工程学网站 www.apple.com/about/ergonomics。 显示器故障排除 在执行以下任何步骤之前,请确定电脑已开启,显示器的电源线已插入接地的电源插座,所有电缆 都已正确连接在电脑和显示器上,并且电脑没有处于睡眠模式中。 如果屏幕上没有画面:  请再次检查电缆和插头以确定它们已正确连接在电脑和显示器上。  请确定电脑已开启,且没有处于睡眠模式中。如果 MacBook Pro 显示屏已合上,请使用外置键 盘或鼠标将 MacBook Pro 从睡眠中唤醒。  从已接地的电源插座上拔下显示器的电源线,等待几分钟,然后重新插上电源线。  将 PRAM 复位,方法是在启动电脑时按住 Command (x)、Option (z)、P 和 R 组合键,直 至第二次听到启动声。 如果屏幕变暗:  确定显示器的亮度已正确设定。选取苹果菜单 () >“系统偏好设置”,然后点按“显示器”。 拖移“亮度”滑块以调整亮度。  如果显示器上的颜色太深或不正确,则可能需要校准显示器。打开“显示器”偏好设置,点 按“颜色”标签,再点按“校准”,然后按照指示进行操作。 如果 MacBook Pro 不充电: 确定显示器的 MagSafe 插头已正确插入 MacBook Pro 上的 MagSafe 电源端口。 如果显示器上内建的 FaceTime HD 摄像头、麦克风、扬声器系统或端口不工作: 确定显示器的 Thunderbolt 电缆已牢固地插入电脑上的 Thunderbolt 端口。只有当此电缆已连接 在电脑上时,显示器的摄像头、麦克风、扬声器系统和端口才会工作。 44 简体中文 更多故障排除信息 可以在下面的显示器支持网站上找到更多故障排除信息:www.apple.com.cn/support/displays。 了解更多信息及服务与支持 可以在 Apple 网站上和“Mac 帮助”中找到有关显示器的更多信息。 若要了解 请参阅 使用显示器 打开“Mac 帮助”,然后搜索“显示器”。 显示器服务、支持、讨论、故障排 除以及软件下载 显示器支持网站:www.apple.com.cn/support/displays。 有关显示器的最新信息 Apple Display 显示器网站:www.apple.com.cn/displays。 注册显示器 Apple Product Registration(Apple 产品注册)网站: www.apple.com/register。 简体中文 45 技术规格  型号:A1407  分辨率:2560 x 1440 @ 60 Hz  端口: • 三个高速 USB 2.0 端口 • 一个千兆位以太网端口 • 一个 Thunderbolt 端口 • 一个 FireWire 800 端口  摄像头和麦克风:带麦克风的内建 FaceTime HD 摄像头  扬声器:内建 2.1 声道扬声器,输出功率 49 瓦 尺寸:  重量:10.7 公斤(23.5 磅)     高度:488.1 毫米(19.2 英寸) 宽度:651.7 毫米(25.65 英寸) 厚度(含支架):208.13 毫米(8.2 英寸) 可视尺寸:对角线 685.8 毫米(27 英寸) 操作环境:  操作温度:10° 至 35° C(50° 至 95° F)  相对湿度:20% 至 80%(非凝结)  海拔高度:0 至 3048 米(0 至 10,000 英尺) 46 简体中文 使用入門 您的AppleThunderboltDisplay是設計與配備Thunderbolt 埠的Mac電腦完美地搭配使用。它的特色在於LED背光照 明的寬螢幕顯示器、MagSafe接頭可為MacBookPro電腦充 電、內建FaceTimeHD攝影機、麥克風、揚聲器系統、安全 鎖孔和連接埠。 以下頁面中的指示能協助您設定並使用您的新顯示器。您可以瞭解如何執行下列 事項:  將顯示器連接到電腦上  使用顯示器的攝影機、麥克風、揚聲器系統和連接埠  調整顯示器的設定 【注意】您可以將 Apple Thunderbolt Display 連接至任何配備 Thunderbolt 埠的 Mac 電腦。 【重要事項】在您設定和使用顯示器之前,請先仔細閱讀所有的安裝說明(以及 第 53 頁中的安全資訊)。 如需可搭配此顯示器使用之特定電腦和顯示卡的更多資訊,請前往 www.apple.com/tw/displays 網站。 繁體中文 47 安裝您的顯示器 請依照這些步驟來設定 Apple Thunderbolt Display: 1 撕下顯示器和接線上的保護膜。 2 將電源線插入顯示器,然後將交流電的插頭插入接地的電源插座。 3 將 Thunderbolt 接線連接至電腦的 Thunderbolt 埠上。 Apple Thunderbolt Display MacBook Pro MagSafe ཋਣ અΔؿ ཋై Thunderbolt ਣ 4 若您是連接 MacBook Pro,請將 MagSafe 接頭插入 MacBook Pro 的 MagSafe 電源 埠,來為電腦提供電力並且替電池充電。 5 若您的電腦已經關閉,請按下電腦上的電源按鈕(®)來啟動電腦。當您啟動電 腦時,顯示器會自動開啟。 48 繁體中文 在 MacBook Pro 的上蓋闔上時進行安裝 您可以闔上 MacBook Pro 的上蓋,只單獨使用 Apple Thunderbolt Display。請依 照上一頁的安裝說明,並確定已將顯示器的 MagSafe 接頭插入 MacBook Pro 上的 MagSafe 電源埠。 若要闔上 MacBook Pro 的上蓋來使用 Apple Thunderbolt Display: 1 將外接的 USB 鍵盤和滑鼠連接到顯示器上的 USB 埠,或使用“Bluetooth® 設定輔 助程式”來安裝無線鍵盤和滑鼠。 2 請確定 MacBook Pro 已開機。 3 闔上 MacBook Pro 的上蓋,使其進入睡眠狀態。 4 稍候片刻,然後按下外接鍵盤上的任意按鍵或按下滑鼠按鈕,來喚醒您的 MacBook Pro。 將 Apple Thunderbolt Display 設定為附加顯示器 當您的 MacBook Pro 上蓋處於開啟狀態時,您可以將同一個桌面同步顯示在兩部 顯示器上,或將附加的顯示器作為桌面的延伸。請使用“顯示器”偏好設定來設 定視訊同步影像或延伸桌面。 若要設定視訊同步影像或延伸桌面: 1 請選擇“蘋果 ()”>“系統偏好設定⋯”,然後按一下“顯示器”。 2 按一下“排列方式”標籤頁,然後依照螢幕上的指示進行。 繁體中文 49 使用您的顯示器 Apple Thunderbolt Display 配備內建的 FaceTime HD 攝影機、麥克風和揚聲器系統。 ோКࠓ ʑ ۺFaceTime HD ᙘᄧዀ ᐰኂӡ 使用內建 FaceTime HD 攝影機和麥克風 您可以用內建的 FaceTime HD 攝影機和麥克風,來使用 FaceTime、iChat、iMovie 和 Photo Booth 等應用程式擷取靜態影像、視訊和聲音。 若要設定攝影機和麥克風來搭配 iChat 使用: 1 請按一下 Dock 中的 iChat 圖像來打開 iChat 應用程式。 2 選擇 iChat >“偏好設定⋯”,然後按一下“音訊 / 視訊”。 3 從“攝影機”彈出式選單中選擇“FaceTime HD 攝影機(顯示器)”。 4 從“麥克風”彈出式選單中選擇“顯示音訊”。 50 繁體中文 設定聲音輸入和輸出 您可以透過顯示器上的揚聲器系統,來聆聽音樂、影片、遊戲和多媒體檔案。 您可以使用麥克風來進行錄音,或使用 iChat 或 FaceTime 來與朋友聊天。請使 用“聲音”偏好設定來管理聲音的輸入和輸出。 若要設定聲音輸入: 1 請選擇“蘋果 ()”>“系統偏好設定⋯”,然後按一下“聲音”。 2 按一下“聲音”偏好設定中的“輸入”標籤頁。 3 選擇“顯示器音訊”,以透過顯示器的麥克風輸入聲音。 若要設定聲音輸出: 1 請選擇“蘋果 ()”>“系統偏好設定⋯”,然後按一下“聲音”。 2 按一下“聲音”偏好設定中的“輸出”標籤頁。 3 選擇“顯示器音訊”,來透過顯示器的揚聲器系統聆聽聲音。 每當您將顯示器連接到電腦上時,都會使用這些聲音設定。在您更改設定之前, 它們會一直有效。 調整解析度、亮度和顏色 您的 Apple Thunderbolt Display 可使用內建的環境光度感測器,依據目前環境的照 明程度來自動調整螢幕亮度。您可以在“顯示器”偏好設定裡啟用或停用自動亮 度調整。 若要調整解析度或亮度: 1 請選擇“蘋果 ()”>“系統偏好設定⋯”,然後按一下“顯示器”。 2 選擇一種解析度,或拖移“亮度”滑桿。 繁體中文 51 您也可以使用外接的 Apple Keyboard 鍵盤來調高( )或調低( )顯示器的亮 度。請確定選單列是位於您要調整的顯示器上。 若要更改顯示器的色彩描述或校正顯示器: 1 按一下“顯示器”偏好設定中的“顏色”標籤頁。 2 選擇顯示器色彩描述,或按一下“校正”,來開啟“螢幕校正器輔助程式”。 如需更多校正顯示器顏色的相關資訊,請從選單列上選擇“輔助說明”>“Mac 輔 助說明”,並搜尋“校正”。 安全鎖孔和連接埠 Gigabit Ⱥʪ၉༏ ਣ Thunderbolt ਣ USB 2.0 ਣ3 ΪͲᔧʬ FireWire 800 ਣ 若要保護顯示器的安全,請在安全鎖孔上連接防竊鎖鏈。 52 繁體中文 G Gigabit 乙太網路埠(10/100/1000Base-T) 連接高速 10/100/1000Base-T 乙太網路、連接 DSL 或纜線數據機,或連接其他電腦來 傳送檔案。乙太網路埠會自動偵測其他乙太網路設備。 Thunderbolt 埠 (高速資料、視訊和音訊傳輸) 連接與 Thunderbolt 相容的設備來進行高速資料傳輸,或連接其他使用 Thunderbolt 的顯示器。Thunderbolt 埠無法與 DVI、VGA 或 DisplayPort 顯示器或轉換器相容。 d 三個高速 USB(通用序列匯流排)2.0 埠 連接 iPod、iPhone、iPad、滑鼠、鍵盤、印表機、磁碟機、相機、搖桿、外接 USB 數據機和其他設備。您也可以連接 USB 1.1 設備。 H FireWire 800 埠 連接外接設備,例如數位攝影機和儲存設備。此埠能提供最多 7 瓦特的電力。 【重要事項】您可以使用 USB 埠來為 iPad、iPhone 或 iPod 充電,即使顯示器未 連接電腦時也可以進行充電。若您要使用這些連接埠來同步電腦與 iPad、iPhone 或 iPod 之間的資料,請確定顯示器的 Thunderbolt 接線已連接至電腦上的 Thunderbolt 埠。 為顯示器使用 VESA 裝設方案 您可以使用 VESA Mount Adapter 套件,將顯示器安裝到替用的裝設方案上,該套 件可在線上 Apple Store 購買,網址為:http://www.apple.com/tw/store。請使用該 套件來將任何可用的 VEGA 相容裝設方案應用於您的顯示器。您僅需依照套件隨 附的說明便能輕鬆完成安裝。 維護與安全 當您搬起顯示器或將其重新擺放至新位置時,必須先拔掉接線和電源線。當重新 擺放顯示器時,請使用正確的移動方式。當您抬起或搬運顯示器時,請握住顯示 器的邊緣。請勿抓住其支架或接線部位。 繁體中文 53 若要清潔顯示器的螢幕: 1 請拔掉電源線。 2 請使用柔軟乾燥的布料來擦拭螢幕上的灰塵。 【警告】請勿使用含酒精或其他化學成分的清潔劑來清潔螢幕。請使用螢幕或 顯示器專用的清潔劑。請勿直接朝螢幕噴灑清潔劑。清潔劑可能會滲入顯示器 內並造成損害。 請勿在空氣中充滿大量灰塵,或香煙、雪茄、煙灰缸、鍋爐或壁爐煙塵的處所使 用顯示器,也不要在使用未過濾自來水的超音波濕潤器旁使用顯示器。由抽煙、 烹飪、燃燒或使用未過濾自來水的超音波濕潤器所產生的空氣微粒,在極少數的 情況下會進入顯示器的通風孔,並且在特定的情況下會導致顯示器的玻璃面板內 側產生輕微起霧的現象。 請依照下列的安全指示來使用顯示器:  完全切斷電源的唯一方法是將電源線拔掉。請抓取插頭,切勿拉扯電源線。  如果電源線有磨損或破損的情形,或是您將液體潑灑到顯示器上,或者顯示器 摔落或遭受其他損壞,請立即拔除電源線。 【警告】請務必使用顯示器隨附的電源線。電源線含有三線接地插頭(插頭含有 第三個接地針),且僅適用於接地的交流電插座。若是因為您的插座並非接地插 座而無法將插頭插入,請聯絡合格的電工,將插座更換成合適的接地插座。 【警告】顯示器是屬於高電壓的組件,不論是任何原因,即使是未插電的情況 下,都不應將其拆解。若您的顯示器需要維修,請參閱第 57 頁「更多內容、服務 與支援」。 54 繁體中文 人體工學 下列的說明能幫助您調整顯示器,以降低閃光並符合您的體型與姿態。  當您坐在鍵盤前方時,請重新調整顯示器位置,讓螢幕頂端稍微低於您的水平 視線 。眼睛和螢幕之間的最佳距離因人而異,一般認為 45 至 70 公分(18 至 28 英吋)較為合適。  將顯示器向上或向下傾斜調整其角度,以便將上方燈光與週圍窗戶光線所造成 的螢幕閃光及反光降到最低 。 如需更多健康、安全和維護的相關資訊,請參訪 Apple 網 站:www.apple.com/about/ergonomics。 繁體中文 55 顯示器的疑難解答 進行這些步驟之前,請先確定您的電腦已開機、顯示器已插入接地的電源插座, 且所有接線都已適當地連接到電腦和顯示器上,而電腦也沒有處於睡眠模式。 如果螢幕上沒有出現任何畫面:  再次檢查接線和接頭,確定它們已穩固地連接到電腦和顯示器。  確定電腦已開機,且並未處於睡眠模式。如果 MacBook Pro 的上蓋已闔上,請使 用外接鍵盤或滑鼠來將 MacBook Pro 從睡眠狀態喚醒。  從接地的電源插座上拔下顯示器的電源線,稍候幾分鐘,然後再重新插上 電源線。  當您重新啟動電腦時,可同時按下 Command(x)、Option(z)、P 和 R 鍵來 重置 PRAM,直到您聽到第二次的啟動聲為止。 如果螢幕變暗:  確定您已設定合適的顯示器亮度。選擇“蘋果 ()”>“系統偏好設定⋯”,然 後按一下“顯示器”。拖移“亮度”滑桿來調整亮度。  如果顯示器的色彩過於飽和或不正確,您可能需要校正顯示器的顏色。請打 開“顯示器”偏好設定,按一下“顏色”標籤頁,按一下“校正”,然後依照 指示執行。 如果 MacBook Pro 無法充電: 請確定顯示器的 MagSafe 接頭已正確地連接在 MacBook Pro 的 MagSafe 電源埠中。 如果顯示器的內建 FaceTime HD 攝影機、麥克風、揚聲器系統或連接埠沒有作用: 請確定顯示器的 Thunderbolt 接線已穩固地插入電腦上的 Thunderbolt 埠中。只有 在此接線與電腦連接時,顯示器的攝影機、麥克風、揚聲器系統和連接埠才能正 常運作。 56 繁體中文 更多疑難解答的資訊 您也可以在顯示器的支援網站 www.apple.com/tw/support/displays 上找到更多疑 難解答的資訊。 更多內容、服務與支援 您可以從 Apple 網站上或是在“Mac 輔助說明”中找到更多顯示器相關的資訊。 要瞭解的項目 請參閱 使用您的顯示器 “Mac 輔助說明”並搜尋“顯示器”。 顯示器的服務、支援、討 論、疑難解答以及軟體下載 顯示器支援網站:www.apple.com/tw/support/displays。 關於顯示器的最新資訊 Apple 顯示器網站:www.apple.com/tw/displays。 註冊您的顯示器 Apple 產品註冊網站:www.apple.com/tw/register。 繁體中文 57 技術規格  型號:A1407  解析度:2560 x 1440 @ 60 Hz  傳輸埠: • 三個高速 USB 2.0 埠 • 一個 Gigabit 乙太網路埠 • 一個 Thunderbolt 埠 • 一個 FireWire 800 埠  攝影機和麥克風:內建 FaceTime HD 攝影機和麥克風  揚聲器:內建 2.1 揚聲器(輸出功率 49 W) 大小:  重量:10.7 公斤(23.5 磅)     高度:488.1 公釐(19.2 英吋) 寬度:651.7 公釐(25.65 英吋) 深度(包含支架):208.13 公釐(8.2 英吋) 可視畫面:685.8 公釐(27 英吋)對角線 作業環境:  作業溫度:攝氏 10° 至 35°(華氏 50° 至 95°)  相對濕度:20% 到 80%(非凝結狀態)  操作標高:0 到 3048 公尺(0 到 10,000 英呎) 58 繁體中文 시작하기 AppleThunderboltDisplay는Thunderbolt포트가장착된Mac 컴퓨터와완벽하게동작하도록디자인되었습니다.LED배경조명 와이드스크린모니터,MacBookPro를충전하기위한MagSafe 커넥터,내장FaceTimeHD카메라,마이크,스피커시스템,보안 슬롯및포트가장착되어있습니다. 다음 페이지부터 설명된 지침은 새로운 모니터를 설정하고 사용하는 것을 도와줍니다. 방법 배우기:  모니터를 컴퓨터에 연결  모니터의 카메라, 마이크, 스피커 시스템 및 포트 사용  모니터 설정값 조정 참고: Apple Thunderbolt Display를 Thunderbolt 포트가 있는 모든 Mac 컴퓨터에 연결할 수 있습니다. 중요사항: 처음 모니터를 설치 및 사용하기 전에 모든 설치 지침(및 66페이지에서 시작하는 안전 정보)을 주의깊게 읽으십시오. 자신의 모니터와 호환되는 특정 컴퓨터 및 그래픽 카드에 대한 정보를 보려면, www.apple.com/kr/displays 사이트로 이동하십시오. 한국어 59 모니터설치하기 Apple Thunderbolt Display를 설치하려면 다음의 단계를 따르십시오. 1 모니터 및 케이블에서 보호 필름을 제거하십시오. 2 전원 코드를 모니터에 꽂은 다음, AC 플러그를 접지된 전원 콘센트에 꽂으십시오. 3 Thunderbolt 케이블을 컴퓨터의 Thunderbolt 포트에 연결하십시오. Apple Thunderbolt Display ႚხౘ ႖ဴᇮቼ MacBook Pro MagSafe ႖ဴዅቼ Thunderbolt ዅቼ 4 MacBook Pro에 연결하는 경우 MagSafe 커넥터를 MacBook Pro의 MagSafe 전원 포트에 연결하여 전원을 공급하고 배터리를 충전하십시오. 5 컴퓨터가 꺼져있는 경우 컴퓨터의 전원(®) 버튼을 눌러 켜십시오. 컴퓨터가 시동되면 모니터는 자동으로 켜집니다. 60 한국어 덮개를 닫은 채로 MacBook Pro 설정하기 MacBook Pro의 덮개를 닫고 Apple Thunderbolt Display만 사용할 수 있습니다. 이전 페이지의 설정 지침을 따르고 모니터의 MagSafe 커넥터가 MacBook Pro의 MagSafe 전원 포트에 연결되어 있는지 확인하십시오. 덮개를 닫은 채로 MacBook Pro와 함께 Apple Thunderbolt Display를 사용하려면, 1 외장 USB 키보드 및 마우스를 모니터의 USB 포트에 연결하거나 Bluetooth® 설정 지원을 사용하여 무선 키보드 및 마우스를 설정하십시오. 2 MacBook Pro가 켜져 있는지 확인하십시오. 3 MacBook Pro의 덮개를 닫아 잠자기 상태로 설정합니다. 4 몇 초간 기다린 다음, 외장 키보드의 아무 키나 누르거나 마우스를 클릭하여 MacBook Pro를 깨우십시오. Apple Thunderbolt Display를 추가 모니터로 설정하기 MacBook Pro의 덮개가 열려있는 상태에서 두 개의 모니터에 같은 데스크탑 이미지를 미러링 (반영)하거나 데스크탑의 확장 영역으로 추가 모니터를 사용할 수 있습니다. 모니터 환경설정을 사용하여 비디오 미러링 또는 확장 데스크탑을 설정할 수 있습니다. 비디오 미러링 또는 확장 데스크탑을 설정하려면, 1 Apple() > 시스템 환경설정을 선택하고 모니터를 클릭하십시오. 2 정렬 탭을 클릭하고 화면 상의 지침을 따르십시오. 한국어 61 모니터사용하기 Apple Thunderbolt Display에는 내장 FaceTime HD 카메라, 마이크 및 스피커 시스템이 있습니다. ൠၦሙ ஏၿ FaceTime HD ᆽඈೡ ༺ዳᇑགྷ༺ቋ 내장 FaceTime HD 카메라 및 마이크 사용하기 내장 FaceTime HD 카메라와 마이크를 사용하여 FaceTime, iChat, iMovie 및 Photo Booth 같은 응용 프로그램을 사용하여 정지 이미지, 비디오 및 사운드를 캡처할 수 있습니다. 카메라와 마이크를 iChat과 사용하도록 설정하려면, 1 Dock에 있는 iChat 아이콘을 클릭하여 iChat 응용 프로그램을 실행하십시오. 2 iChat > 환경설정을 선택한 다음 오디오/비디오를 클릭하십시오. 3 카메라 팝업 메뉴에서 FaceTime HD 카메라(모니터)를 선택하십시오. 4 마이크 팝업 메뉴에서 모니터 오디오를 선택하십시오. 62 한국어 사운드 입력 및 출력 설정하기 모니터의 스피커 시스템을 통해 음악, 동영상, 게임 및 멀티미디어 파일을 들을 수 있습니다. 마이크를 사용하여 사운드를 녹음하거나 iChat 또는 FaceTime을 사용하여 친구와 대화할 수 있습니다. 사운드 입력 및 출력을 관리하려면 사운드 환경설정을 사용하십시오. 사운드 입력을 설정하려면, 1 Apple() > 시스템 환경설정을 선택하고 사운드를 클릭하십시오. 2 사운드 환경설정에서 입력 탭을 클릭하십시오. 3 모니터의 마이크를 통해 사운드를 입력하려면 모니터 오디오를 선택하십시오. 사운드 출력을 설정하려면, 1 Apple() > 시스템 환경설정을 선택하고 사운드를 클릭하십시오. 2 사운드 환경설정에서 출력 탭을 클릭하십시오. 3 모니터의 스피커 시스템을 통해 사운드를 들으려면 모니터 오디오를 선택하십시오. 이러한 사운드 설정값은 모니터가 컴퓨터에 연결될 때마다 사용됩니다. 변경하기 전까지 설정값은 유지됩니다. 해상도, 밝기 및 색상 조정하기 Apple Thunderbolt Display는 내장 주변광 센서를 사용하여 현재 빛의 상태에 따라 자동으로 화면 밝기를 조절합니다. 모니터 환경설정에서 자동 밝기를 켜거나 끌 수 있습니다. 해상도 또는 밝기를 변경하려면, 1 Apple() > 시스템 환경설정을 선택하고 모니터를 클릭하십시오. 2 해상도를 선택하거나 밝기 슬라이더를 드래그하십시오. 외장 Apple Keyboard의 밝기 키를 사용하여 모니터의 밝기를 높이거나( ) 낮출( ) 수도 있습니다. 메뉴 막대가 조절하려는 모니터에 있는지 확인하십시오. 한국어 63 모니터 색상 프로파일을 변경하거나 모니터를 보정하려면, 1 모니터 환경설정에서 색상 탭을 클릭하십시오. 2 모니터 색상 프로파일을 선택하거나 보정을 클릭하여 모니터 보정기 지원을 실행하십시오. 모니터 보정에 대한 자세한 정보를 보려면, 메뉴 막대에서 도움말 > Mac 도움말을 선택하고 “보정”으로 검색하십시오. 보안 슬롯 및 포트 ૺਜ਼๗ቼ ၦధற ዅቼ Thunderbolt ዅቼ USB 2.0 ዅቼ੭ พྦ༽ഠ FireWire 800 ዅቼ 모니터를 안전하게 사용하려면, 잠금 케이블을 보안 슬롯에 장착하십시오. 64 한국어 G 기가비트 이더넷 포트(10/100/1000Base-T) 고속 10/100/1000Base-T 이더넷 네트워크에 연결하거나 DSL이나 케이블 모뎀을 연결하거나 다른 컴퓨터에 연결하여 파일을 전송합니다. 이더넷 포트가 다른 이더넷 장비를 자동으로 탐지합니다. Thunderbolt 포트(고속 데이터, 비디오 및 오디오) 고속 데이터 전송을 위해 Thunderbolt 지원 장비를 연결하거나 Thunderbolt를 사용하는 다른 모니터를 연결합니다. 이 Thunderbolt 포트는 DVI, VGA 또는 DisplayPort 모니터 또는 어댑터와 호환되지 않습니다. d 고속 USB(Universal Serial Bus) 2.0 포트 3개 iPod, iPhone, iPad, 마우스, 키보드, 프린터, 디스크 드라이브, 디지털 카메라, 조이스틱, 외장 USB 모뎀 등을 연결합니다. USB 1.1 장비를 연결할 수도 있습니다. H FireWire 800 포트 디지털 비디오 카메라 및 저장 장치와 같은 외부 장비를 연결합니다. 해당 포트는 최대 7W의 전력을 공급합니다. 중요사항: 모니터가 컴퓨터에 연결되어 있지 않더라도 USB 포트를 사용하여 iPad, iPhone이나 iPod을 충전할 수 있습니다. 이들 포트 중 하나를 사용하여 컴퓨터와 iPad, iPhone이나 iPod 간에 정보를 동기화하는 경우, 컴퓨터의 Thunderbolt 포트에 모니터의 Thunderbolt 케이블이 연결되어 있는지 확인하십시오. 모니터와 VESA Mounting Solution 사용하기 Apple 온라인 스토어, www.apple.com/kr/store 사이트에서 구입할 수 있는 VESA Mount Adapter 키트를 사용하여 모니터를 대체 마운팅 솔루션에 장착할 수 있습니다. 해당 키트를 사용하여 모니터를 사용 가능한 VESA 호환 마운팅 솔루션에 부착하십시오. 해당 키트에 포함된 지침을 따르기만 하면 됩니다. 한국어 65 관리와안전 모니터를 들거나 위치를 바꾸기 전에, 케이블과 전원 코드를 연결 해제하십시오. 모니터의 위치를 바꾸려면 모니터를 올바른 방법으로 들어 올리십시오. 모니터를 들거나 운반할 때는 가장자리를 잡으십시오. 모니터의 스탠드나 코드를 잡고 들어올리지 마십시오. 모니터 화면을 청소하려면, 1 전원 코드를 연결 해제하십시오. 2 부드럽고 마른 천을 사용하여 화면의 먼지를 닦아내십시오. 경고: 알코올이나 아세톤이 포함된 세척제로 모니터의 화면을 닦지 마십시오. 스크린 또는 모니터 전용 세척제를 사용하십시오. 화면에 직접 세척제를 뿌리지 마십시오. 모니터 안으로 스며들어 손상을 일으킬 수 있습니다. 공기 중 상당량의 먼지나 담배, 시가, 재떨이 또는 난로에서의 연기가 있거나, 여과되지 않은 수도꼭지에서 받은 물을 사용하는 초음파 가습기가 있는 장소에서 모니터를 작동하지 마십시오. 드문 경우이지만, 흡연, 요리, 굽기 또는 여과되지 않은 수도꼭지에서 받은 물을 초음파 가습기에 사용할 때 발생하는 극소량의 공기 중 티끌이 모니터의 통풍 장치 구멍으로 들어오면, 어떤 경우에는 모니터를 덮고 있는 유리 패널의 안쪽 표면에 약간의 습기가 찰 수 있습니다. 66 한국어 모니터 사용시 아래의 안전 지침을 따르십시오.  전원을 완전히 차단하는 유일한 방법은 전원 코드를 연결 해제하는 것입니다. 반드시 코드가 아닌 플러그를 당기십시오.  전원 코드가 닳거나 손상되고, 모니터에 액체를 엎지르거나 모니터가 기타 방식으로 손상되거나 떨어졌다면 전원을 즉시 차단하십시오. 경고: 모니터와 함께 제공되는 전원 코드만 사용하십시오. 전원 코드에는 접지된 AC 콘센트에만 맞는 3선 접지 플러그(세 번째 접지 핀이 있는 플러그)가 달려 있습니다. 콘센트가 접지되어 있지 않아서 콘센트에 플러그를 꽂을 수 없다면, 공인 전기 기술자에게 연락하여 적절하게 접지된 콘센트로 교체할 것을 요청하십시오. 경고: 모니터는 고전력의 구성품이므로, 전원이 연결 해제되어 있더라도 어떤 이유로도 절대 열지 마십시오. 모니터에 서비스가 필요하다면, 70페이지의 “더 배우기, 서비스 및 지원”을 참조하십시오. 한국어 67 인체공학 모니터의 반사와 빛을 줄이고 여러분의 체격과 신체에 맞게 모니터를 조절하려면 다음과 같이 하십시오.  키보드에 손을 놓고 앉았을 때 화면 상단이 눈높이보다 약간 낮은 위치에 오도록 모니터를 조절하십시오. 대부분의 사용자의 경우 눈과 화면 사이의 최적 거리로 45~70cm를 권장하지만 사용자에 맞게 최적의 거리를 유지하십시오.  모니터를 위 아래로 기울이면서 머리 위의 조명과 창문으로부터 비치는 빛과 반사가 최소화되도록 조절하십시오. ࿌ၡ ૼၿၕ ዚધ 45~70cm ጷඓၡ ືఎ ิึၕ ைၦ ྤ೭ച(ᅙືၕ ைၦ ᆓ࿌ කఁሽၡ ைၦ Ⴎ႗ዻཊགྷ.) ኖ ၕ ၩჯ໓ ື ኖၔ ༘ዀၒച ವ௴ ྾ ૺါ ౾ ྤ೭ ิึၦ ౾෦ၦ ෦ᅸხ த႕ ఋ൘௴ ྾ ૺါ 건강, 안전 및 유지보수에 관한 추가 정보는 Apple 인체 공학 웹 사이트, www.apple.com/about/ergonomics 사이트를 방문하십시오. 68 한국어 ຫ௴ ၕ ዳዻഛ ጷඓၕ ᆳዻધ ᅙື ྤ೭௴ ୳ዻ ఌၦ ෧ၕ ࿏௴ ෧ၕ ዀዀዻ ၒཊགྷ. 모니터문제해결하기 다음 단계를 수행하기 전에, 컴퓨터가 켜져 있는지, 모니터가 접지된 전원 콘센트에 연결되어 있는지, 모든 케이블이 컴퓨터 및 모니터에 올바르게 연결되어 있는지, 그리고 컴퓨터가 잠자기 상태가 아닌지 확인하십시오. 화면에 이미지가 나타나지 않는 경우:  케이블 및 커넥터를 다시 한 번 확인하여 컴퓨터와 모니터에 올바르게 연결되어 있는지 점검하십시오.  컴퓨터가 켜져 있는지, 잠자기 모드는 아닌지 확인하십시오. MacBook Pro의 덮개가 닫혀 있다면 외장 키보드 또는 마우스를 사용하여 MacBook Pro를 잠자기 모드에서 깨우십시오.  접지된 전원 콘센트에서 모니터의 전원 코드를 연결 해제하고 몇 분을 기다린 다음 다시 켜십시오.  Command(x), Option, P 및 R 키를 시동음이 두 번 들릴 때까지 눌러서 컴퓨터를 재시동하여 PRAM을 재설정하십시오. 화면이 흐리게 표시되는 경우:  모니터의 밝기가 올바르게 설정되어 있는지 확인하십시오. Apple() > 시스템 환경설정을 선택한 다음, 모니터를 클릭하십시오. 밝기 슬라이더를 드래그하여 밝기를 조정하십시오.  모니터의 색상의 채도가 너무 강하거나 적당하지 않으면, 모니터를 보정해야 합니다. 모니터 환경설정을 열고 색상 탭을 클릭하여 보정을 클릭한 다음, 지침을 따르십시오. MacBook Pro가 충전되지 않는 경우: 모니터의 MagSafe 커넥터가 MacBook Pro의 MagSafe 전원 포트에 제대로 연결되어 있는지 확인하십시오. 한국어 69 모니터의 내장 FaceTime HD 카메라, 마이크, 스피커 시스템 또는 포트가 작동하지 않는 경우: 모니터의 Thunderbolt 케이블이 컴퓨터의 Thunderbolt 포트에 단단하게 꽂혀 있는지 확인하십시오. 모니터의 카메라, 마이크, 스피커 시스템 및 포트는 이 케이블이 컴퓨터에 연결되어 있을 때만 동작합니다. 추가 문제 해결 정보 보다 자세한 문제 해결 정보는 모니터 지원 웹 사이트, www.apple.com/kr/support/displays 페이지에서 찾을 수 있습니다. 더배우기,서비스및지원 Apple 웹 사이트와 Mac 도움말에서 모니터에 관한 자세한 정보를 찾을 수 있습니다. 70 주제 참조 모니터 사용하기 Mac 도움말에서 “모니터”로 검색하십시오. 모니터 서비스, 지원, 토론, 문제 해결 및 소프트웨어 다운로드 모니터 지원 사이트, www.apple.com/kr/support/displays. 모니터에 관한 최신 정보 Apple 모니터 사이트, www.apple.com/kr/displays. 모니터 등록하기 Apple 제품 등록 사이트, www.apple.com/kr/register. 한국어 제품사양  모델 번호: A1407  해상도: 2560x1440 @ 60Hz  포트: • 고속 USB 2.0 포트 3개 • 기가비트 이더넷 포트 1개 • Thunderbolt 포트 1개 • FireWire 800 포트 1개  카메라 및 마이크: 마이크가 장착된 내장 FaceTime HD 카메라  스피커: 49W 출력의 내장 2.1 스피커 규격:      무게: 10.7kg 높이: 488.1mm 너비: 651.7mm 폭(받침대 포함): 208.13mm 가시화면: 685.8mm(대각선) 동작 환경:  동작 온도: 10°~35° C  상대 습도: 20%~80%(비응결)  고도: 0~3048m 한국어 71 Bantuan Persiapan Apple Thunderbolt Display didesain untuk berfungsi sempurna dengan komputer Mac yang dilengkapi port Thunderbolt. Produk ini dilengkapi tampilan layar lebar dengan lampu latar LED, konektor MagSafe untuk mengisi daya komputer MacBook Pro, kamera FaceTime HD, mikrofon, dan sistem speaker internal, serta slot keamanan dan port. Petunjuk pada halaman berikut akan membantu Anda mempersiapkan dan menggunakan layar Anda yang baru. Pelajari cara untuk:  Menyambungkan layar ke komputer  Menggunakan kamera, mikrofon, sistem speaker, dan port pada layar  Menyesuaikan pengaturan layar Catatan: Anda dapat menyambungkan Apple Thunderbolt Display ke komputer Mac manapun yang dilengkapi port Thunderbolt. Penting: Baca semua petunjuk pemasangan (dan informasi keselamatan mulai dari page 80) sebelum Anda mempersiapkan dan menggunakan layar. Untuk informasi tentang komputer dan kartu grafis tertentu yang kompatibel dengan layar ini, kunjungi www.apple.com/displays. Bahasa Indonesia 73 Mempersiapkan Layar Ikuti langkah berikut untuk mempersiapkan Apple Thunderbolt Display: 1 Lepaskan lapisan pelindung dari layar dan kabel. 2 Sambungkan kabel daya ke layar, lalu sambungkan konektor AC ke stopkontak yang dilengkapi ground. 3 Sambungkan kabel Thunderbolt ke port Thunderbolt pada komputer. Apple Thunderbolt Display MacBook Pro Port daya MagSafe Stopkontak yang dilengkapi ground Port Thunderbolt 4 Jika menyambungkan ke MacBook Pro, pasang konektor MagSafe ke port daya MagSafe pada MacBook Pro untuk mengalirkan dayanya dan mengisi daya baterainya. 5 Jika komputer Anda dimatikan, tekan tombol daya (®) untuk menghidupkan komputer. Layar akan hidup secara otomatis saat Anda menghidupkan komputer. 74 Bahasa Indonesia Mempersiapkan MacBook Pro dengan Layar Tertutup Anda dapat menutup layar MacBook Pro dan hanya menggunakan Apple Thunderbolt Display. Ikuti petunjuk konfigurasi pada halaman sebelumnya dan pastikan konektor MagSafe dari layar disambungkan ke port daya MagSafe pada MacBook Pro Anda. Untuk menggunakan Apple Thunderbolt Display dengan layar MacBook Pro tertutup: 1 Sambungkan keyboard dan mouse USB eksternal ke port USB pada layar, atau gunakan Bluetooth® Setup Assistant untuk mengkonfigurasi keyboard dan mouse nirkabel. 2 Pastikan MacBook Pro telah dihidupkan. 3 Tutup layar MacBook Pro untuk mengalihkannya ke modus tidur. 4 Tunggu beberapa detik, lalu tekan salah satu tombol pada keyboard eksternal atau klik mouse untuk membangunkan MacBook Pro. Mengkonfigurasi Apple Thunderbolt Display sebagai Layar Tambahan Bila layar MacBook Pro dibiarkan terbuka, Anda dapat menampilkan gambar desktop yang sama pada kedua layar atau menggunakan layar tambahan sebagai perluasan desktop. Gunakan Displays preferences untuk mengkonfigurasi tampilan ganda atau perluasan desktop. Untuk mengkonfigurasi tampilan ganda atau perluasan desktop. 1 Pilih Apple () > System Preferences, lalu klik Displays. 2 Klik tab Arrangement, lalu ikuti petunjuk di layar. Bahasa Indonesia 75 Menggunakan Layar Apple Thunderbolt Display dilengkapi kamera FaceTime HD, mikrofon, dan sistem speaker internal. Mikrofon Kamera FaceTime HD internal Sistem speaker Menggunakan Kamera FaceTime HD dan Mikrofon Internal Anda dapat menggunakan kamera FaceTime HD dan mikrofon internal untuk mengambil foto, video, dan suara menggunakan aplikasi seperti iChat, iMovie, dan Photo Booth. Untuk mengkonfigurasi kamera dan mikrofon dengan iChat: 1 Klik ikon iChat di Dock untuk membuka aplikasi iChat. 2 Pilih iChat > Preferences, lalu klik Audio/Video. 3 Pilih FaceTime HD Camera (Display) dari menu pop-up Camera. 4 Pilih Display Audio dari menu pop-up Microphone. 76 Bahasa Indonesia Mengkonfigurasi Input dan Output Suara Anda dapat mendengarkan musik, film, permainan, dan file multimedia melalui sistem speaker pada layar. Anda dapat menggunakan mikrofon untuk merekam suara, atau berbicara dengan teman menggunakan iChat atau FaceTime. Gunakan Sound preferences untuk mengelola input dan output suara. Untuk mengkonfigurasi input suara: 1 Pilih Apple () > System Preferences, lalu klik Sound. 2 Klik tab Input di Sound preferences. 3 Pilih Display Audio untuk memasukkan suara melalui mikrofon layar. Untuk mengkonfigurasi output suara: 1 Pilih Apple () > System Preferences, lalu klik Sound. 2 Klik tab Output di Sound preferences. 3 Pilih Display Audio untuk mendengar suara melalui sistem speaker layar. Pengaturan suara ini digunakan setiap kali layar disambungkan ke komputer Anda. Pengaturan akan tetap digunakan hingga Anda mengubahnya. Mengatur Resolusi, Kecerahan, dan Warna Apple Thunderbolt Display dapat secara otomatis mengatur kecerahan layar untuk kondisi pencahayaan yang ada menggunakan sensor cahaya ambien internal. Anda dapat mengaktifkan atau menonaktifkan kecerahan otomatis di Displays preferences. Untuk mengubah resolusi atau kecerahan: 1 Pilih Apple () > System Preferences, lalu klik Displays. 2 Pilih resolusi atau tarik panel geser Brightness. Bahasa Indonesia 77 Anda juga dapat menggunakan tombol kecerahan pada Apple Keyboard eksternal untuk menambah ( ) atau mengurangi ( ) kecerahan layar. Pastikan baris menu berada pada layar yang Anda ingin sesuaikan. Untuk mengubah profil warna layar atau mengkalibrasi layar: 1 Klik tab Color di Displays preferences. 2 Pilih profil warna layar, atau klik Calibrate untuk membuka Display Calibrator Assistant. Untuk informasi lebih lanjut tentang mengkalibrasi layar, pilih Help > Mac Help di baris menu, lalu cari “calibrate.” Slot Keamanan dan Port Port Gigabit Ethernet Port Thunderbolt Port USB 2.0 (3) Slot keamanan Port FireWire 800 Untuk mengamankan layar, pasang kabel pengunci pada slot keamanan. 78 Bahasa Indonesia G Port Gigabit Ethernet (10/100/1000Base-T) Untuk menyambung ke jaringan Ethernet 10/100/1000Base-T berkecepatan tinggi, menyambungkan modem DSL atau modem kabel, maupun menyambungkan ke komputer lain serta mentransfer file. Port Ethernet akan secara otomatis mendeteksi perangkat Ethernet lain. Port Thunderbolt (data, video, dan audio berkecepatan tinggi) Untuk menyambungkan perangkat yang kompatibel dengan Thunderbolt untuk transfer data berkecepatan tinggi, atau menyambungkan layar lain yang menggunakan Thunderbolt. Port Thunderbolt ini tidak kompatibel dengan layar atau adaptor DVI, VGA, atau DisplayPort. d Tiga port USB (Universal Serial Bus) 2.0 berkecepatan tinggi Untuk menyambungkan iPod, iPad, mouse, keyboard, printer, drive disk, kamera digital, joystick, modem USB eksternal, dan perangkat lainnya. Anda juga dapat menyambungkan perangkat USB 1.1. H Port FireWire 800 Untuk menyambungkan perangkat eksternal, seperti kamera video digital dan perangkat penyimpanan. Port ini mampu mengalirkan daya hingga 7 watt. Penting: Anda dapat menggunakan port USB tersebut untuk mengisi daya iPhone atau iPod, meskipun layar Anda tidak disambungkan ke komputer. Jika Anda menggunakan salah satu port untuk mensinkronisasi informasi antara komputer dan iPad, iPhone, atau iPod, pastikan kabel Thunderbolt layar disambungkan ke port Thunderbolt komputer. Menggunakan Solusi Pemasangan VESA dengan Layar Anda dapat memasang layar pada solusi pemasangan alternatif, menggunakan VESA Mount Adapter Kit yang tersedia dari Apple Online Store di www.apple.com/store. Gunakan peralatan tersebut untuk memasang layar pada solusi pemasangan VESA kompatibel apapun yang tersedia. Cukup ikuti petunjuk yang disertakan dengan peralatan. Bahasa Indonesia 79 Perawatan dan Keselamatan Sebelum Anda mengangkat atau memindahkan layar, lepaskan kabel daya dan kabel lainnya. Gunakan teknik pengangkatan yang benar saat memposisikan layar. Saat mengangkat atau membawa layar, pegang pada tepinya. Jangan angkat layar pada dudukan atau kabelnya. Untuk membersihkan layar: 1 Lepaskan kabel daya. 2 Gunakan kain lembut yang kering untuk membersihkan debu dari layar. PERINGATAN: Jangan bersihkan layar dengan cairan pembersih yang mengandung alkohol atau aseton. Gunakan cairan pembersih khusus untuk layar. Jangan semprotkan cairan pembersih langsung ke layar. Cairan dapat menetes ke dalam layar sehingga menyebabkan kerusakan. Jangan gunakan layar di tempat dengan udara yang mengandung banyak debu, atau asap dari rokok, cerutu, asbak, kompor, atau perapian, atau di dekat alat pelembab ultrasonik yang menggunakan air keran tanpa filter. Partikel udara yang dihasilkan dari merokok, memasak, membakar, atau menggunakan alat pelembab ultrasonik dengan air tanpa filter dapat, meski jarang terjadi, memasuki ventilasi layar dan, dalam kondisi tertentu, mengakibatkan kabut tipis di permukaan dalam panel kaca yang menutupi layar. Ikuti panduan keselamatan berikut untuk menggunakan layar:  Satu-satunya cara untuk sepenuhnya memutuskan sambungan daya adalah dengan melepaskan kabel daya. Pastikan Anda menarik konektornya, dan bukan kabelnya.  Putuskan sambungan daya segera jika kabel daya terkoyak atau rusak, jika sesuatu tumpah pada layar, atau jika layar jatuh atau rusak karena penyebab lain. 80 Bahasa Indonesia PERINGATAN: Gunakan hanya kabel daya yang diberikan bersama layar. Kabel daya dilengkapi konektor ground dengan tiga kabel (konektor yang memiliki pin ketiga untuk ground) untuk stopkontak AC yang dilengkapi ground. Jika konektor tidak dapat dipasang ke stopkontak karena stopkontak tidak dilengkapi ground, hubungi teknisi listrik ahli untuk mengganti stopkontak dengan stopkontak yang memiliki ground secara benar. PERINGATAN: Layar ini adalah komponen bertegangan tinggi dan tidak boleh dibuka untuk alasan apapun, bahkan saat kabel dayanya dilepas. Jika layar Anda perlu diperbaiki, lihat “Mengetahui Lebih Lanjut, Layanan, dan Dukungan” on page 84. Bahasa Indonesia 81 Ergonomis Berikut adalah beberapa panduan untuk mengatur layar agar mengurangi efek silau serta untuk menyesuaikan terhadap ukuran dan bentuk fisik Anda.  Atur posisi layar sehingga bagian atas layar berada sedikit di bawah ketinggian mata saat Anda duduk menggunakan keyboard. Jarak ideal ke layar tergantung pada kenyamanan Anda, meskipun jarak ideal sebagian besar orang adalah antara 45 hingga 70 cm (18 hingga 28 inci ).  Atur posisi layar dengan memiringkan ke atas atau ke bawah untuk meminimalkan efek silau dan pantulan dari lampu di atas serta jendela di dekatnya. Shoulders relaxed Forearms and hands in a straight line Forearms level or tilted slightly Lower back supported Thighs tilted slightly 82 Bahasa Indonesia 18–28 in. (45–70 cm) Top of the screen at or slightly below eye level (You may need to adjust the height of your display by raising or lowering your work surface) Screen positioned to avoid reflected glare Clearance under work surface Feet flat on the floor or on a footrest Untuk informasi lebih lanjut tentang kesehatan, keselamatan, dan perawatan, kunjungi situs web ergonomis Apple di www.apple.com/about/ergonomics. Mengatasi Masalah Layar Sebelum melakukan langkah berikut, pastikan komputer Anda dihidupkan, layar disambungkan ke stopkontak yang dilengkapi ground, semua kabel disambungkan dengan benar ke komputer dan layar, dan komputer Anda tidak dalam modus tidur. Jika layar tidak menampilkan gambar:  Periksa kembali kabel dan konektor untuk memastikan telah disambungkan dengan benar ke komputer dan layar.  Pastikan komputer Anda dihidupkan dan tidak dalam modus tidur. Jika layar MacBook Pro ditutup, gunakan keyboard atau mouse eksternal untuk membangunkan MacBook Pro.  Lepaskan kabel daya layar dari stopkontak yang dilengkapi ground, tunggu beberapa menit, lalu sambungkan kembali.  Atur ulang PRAM dengan menghidupkan ulang komputer sambil menekan terus tombol Command (x), Option, P, dan R hingga Anda mendengar suara pengaktifan untuk kedua kalinya. Jika layar redup  Pastikan tingkat kecerahan layar telah diatur dengan benar. Pilih Apple () > System Preferences, lalu klik Displays. Tarik panel geser Brightness untuk mengatur kecerahan.  Jika warna pada layar memiliki saturasi yang berlebihan atau tidak benar, Anda mungkin harus mengkalibrasi layar. Buka Displays preferences, klik tab Color, klik Calibrate, lalu ikuti petunjuknya. Bahasa Indonesia 83 Jika MacBook Pro tidak mengisi daya: Pastikan konektor MagSafe dari layar dipasang dengan benar ke port daya MagSafe pada MacBook Pro. Jika kamera FaceTime HD, mikrofon, sistem speaker internal, atau port USB pada layar tidak berfungsi: Pastikan kabel Thunderbolt dari layar terpasang dengan kuat pada port Thunderbolt di komputer. Kamera, mikrofon, sistem speaker, dan port pada layar hanya berfungsi bila kabel tersebut disambungkan ke komputer. Informasi Lebih Lanjut untuk Mengatasi Masalah Anda dapat menemukan informasi lebih lanjut untuk mengatasi masalah pada situs web dukungan Displays di www.apple.com/support/displays. Mengetahui Lebih Lanjut, Layanan, dan Dukungan Anda dapat menemukan informasi lebih lanjut tentang layar pada situs web Apple dan di Mac Help. 84 Untuk mengetahui tentang Lihat Menggunakan layar Mac Help, lalu cari “displays”. Perbaikan, dukungan, diskusi, cara mengatasi masalah, dan download perangkat lunak untuk layar Situs web Displays Support di www.apple.com/support/displays. Informasi terbaru tentang layar Situs web Apple Displays di www.apple.com/displays. Mendaftarkan layar Anda Situs web Apple Product Registration di www.apple.com/register. Bahasa Indonesia Spesifikasi  Nomor model: A1407  Resolusi: 2560 x 1440 @ 60 Hz  Port: • Tiga port USB 2.0 berkecepatan tinggi • Satu port Gigabit Ethernet • Satu port Thunderbolt • Satu port FireWire 800  Kamera dan mikrofon: Kamera FaceTime HD internal dengan mikrofon  Speaker: Speaker 2.1 internal dengan output 49 W Dimensi:  Berat: 10,7 kg (23,5 lb.)  Tinggi: 488,1 mm (19,2 inci)  Lebar: 651,7 mm (25,65 inci)  Tebal (dengan dudukan): 208,13 mm (8,2 inci)  Area tampilan: 685,8 mm (27 inci) diagonal Lingkungan pengoperasian:  Suhu pengoperasian: 10° hingga 35° C (50° hingga 95° F)  Kelembaban relatif: 20% hingga 80% (tidak berkondensasi)  Ketinggian: 0 hingga 3.048 meter (0 hingga 10.000 kaki) Bahasa Indonesia 85 Regulatory Compliance Information FCC Compliance Statement Canadian Compliance Statement This equipment has been tested and found to comply with the limits for a Class B digital device, pursuant to part 15 of the FCC Rules. These limits are designed to provide reasonable protection against harmful interference in a residential installation. This equipment complies with the Canadian ICES-003 Class B specifications. This equipment generates, uses, and can radiate radio frequency energy and, if not installed and used in accordance with the instructions, may cause harmful interference to radio communications. However, there is no guarantee that interference will not occur in a particular installation. If this equipment does cause harmful interference to radio or television reception, which can be determined by turning the equipment off and on, the user is encouraged to try to correct the interference by one or more of the following measures: • Reorient or relocate the receiving antenna. • Increase the separation between the equipment and receiver. • Connect the equipment into an outlet on a circuit different from that to which the receiver is connected. • Consult the dealer or an experienced radio/TV technician for help. If necessary, consult an Apple Authorized Service Provider or Apple. See the service and support information that came with your Apple product. Or, consult an experienced radio/television technician for additional suggestions. Cet appareil numérique de la classe B est conforme à la norme NMB-003 du Canada. VCCI Class B Statement Russia Korea Class B Statement Important: Changes or modifications to this product not authorized by Apple Inc. could void the EMC compliance and negate your authority to operate the product. B급 기기(가정용 방송통신기자재) This product has demonstrated EMC compliance under conditions that included the use of compliant peripheral devices and shielded cables between system components. It is important that you use compliant peripheral devices and shielded cables between system components to reduce the possibility of causing interference to radios, television sets, and other electronic devices. 역에서 사용할 수 있습니다. 이 기기는 가정용(B급) 전자파적합기기로서 주로 가정에서 사용하는 것을 목적으로 하며, 모든 지 Responsible party (contact for FCC matters only): Apple Inc. Corporate Compliance 1 Infinite Loop, MS 26-A Cupertino, CA 95014 87 Europe–EU Declaration of Conformity Disposal and Recycling Information See www.apple.com/euro/compliance. High-Risk Activities Warning This display is not intended for use in the operation of nuclear facilities, aircraft navigation or communications systems, or air traffic control machines, or for any other uses where the failure of the computer system could lead to death, personal injury or severe environmental damage. This symbol indicates that your product must be disposed of properly according to local laws and regulations. When your product reaches its end of life, contact Apple or your local authorities to learn about recycling options. For information about Apple’s recycling program, go to www.apple.com/recycling. ENERGY STAR® European Union—Disposal Information As an ENERGY STAR partner, Apple has determined that this product meets the ENERGY STAR® requirements for energy efficiency. The ENERGY STAR® program is a partnership with electronic equipment manufacturers to promote energy-efficient products. Improving energy efficiency of products saves money and helps conserve valuable resources. ® This display is shipped with power management enabled, which allows the display to save power by decreasing luminance when used in a room with low ambient lighting. This automatic brightness control feature is enabled as a default setting in Displays preferences. To adjust your display luminance manually, use the display brightness keys on your keyboard or the brightness adjustment in Displays preferences. For more information about ENERGY STAR®, visit: www.energystar.gov 88 The symbol above means that according to local laws and regulations your product should be disposed of separately from household waste. When this product reaches its end of life, take it to a collection point designated by local authorities. Some collection points accept products for free. The separate collection and recycling of your product at the time of disposal will help conserve natural resources and ensure that it is recycled in a manner that protects human health and the environment. Union Européenne – informations sur l’élimination Le symbole ci-dessus signifie que vous devez vous débarasser de votre produit sans le mélanger avec les ordures ménagères, selon les normes et la législation de votre pays. Lorsque ce produit n’est plus utilisable, portez-le dans un centre de traitement des déchets agréé par les autorités locales. Certains centres acceptent les produits gratuitement. Le traitement et le recyclage séparé de votre produit lors de son élimination aideront à préserver les ressources naturelles et à protéger l’environnement et la santé des êtres humains. Europäische Union – Informationen zur Entsorgung Das Symbol oben bedeutet, dass dieses Produkt entsprechend den geltenden gesetzlichen Vorschriften und getrennt vom Hausmüll entsorgt werden muss. Geben Sie dieses Produkt zur Entsorgung bei einer offiziellen Sammelstelle ab. Bei einigen Sammelstellen können Produkte zur Entsorgung unentgeltlich abgegeben werden. Durch das separate Sammeln und Recycling werden die natürlichen Ressourcen geschont und es ist sichergestellt, dass beim Recycling des Produkts alle Bestimmungen zum Schutz von Gesundheit und Umwelt beachtet werden. Unione Europea – informazioni per lo smaltimento Il simbolo qui sopra significa che, in base alle leggi e alle norme locali, il prodotto dovrebbe essere smaltito separatamente dai rifiuti casalinghi. Quando il prodotto diventa inutilizzabile, portalo nel punto di raccolta stabilito dalle autorità locali. Alcuni punti di raccolta accettano i prodotti gratuitamente. La raccolta separata e il riciclaggio del prodotto al momento dello smaltimento aiutano a conservare le risorse naturali e assicurano che venga riciclato nel rispetto della salute umana e dell’ambiente. Europeiska unionen – uttjänta produkter Symbolen ovan betyder att produkten enligt lokala lagar och bestämmelser inte får kastas tillsammans med hushållsavfallet. När produkten har tjänat ut måste den tas till en återvinningsstation som utsetts av lokala myndigheter. Vissa återvinningsstationer tar kostnadsfritt hand om uttjänta produkter. Genom att låta den uttjänta produkten tas om hand för återvinning hjälper du till att spara naturresurser och skydda hälsa och miljö. Türkiye EEE yönetmeliğine (Elektrikli ve Elektronik Eşyalarda Bazı Zararlı Maddelerin Kullanımının Sınırlandırılmasına Dair Yönetmelik) uygundur. Brasil – Informações sobre descarte e reciclagem O símbolo acima indica que este produto e/ou sua bateria não devem ser descartadas no lixo doméstico. Quando decidir descartar este produto e/ou sua bateria, faça-o de acordo com as leis e diretrizes ambientais locais. Para informações sobre o programa de reciclagem da Apple, pontos de coleta e telefone de informações, visite: www.apple.com/br/environment. Apple and the Environment Apple Inc. recognizes its responsibility to minimize the environmental impacts of its operations and products. More information is available on the web: www.apple.com/environment 89 環境向上への取り組み Apple Inc.では、事業活動および製品が環境に与える影響をできる限り小さ Web サイトを参照してください: www.apple.com/jp/environment くするよう取り組んでいます。詳しくは、次の Apple 和环境 Apple Inc. 已经意识到有责任将产品的操作和产品本身对环境造成的影响降 到最小。有关更多信息,可在以下网站上找到: www.apple.com.cn/environment Apple 與環境保護 Apple Inc. 深切體認到企業應有的社會責任,並致力於減少本公 司產品對於環境所造成的影響。您可以在以下網站中找到更多 資訊:www.apple.com/tw/environment Apple과 환경 Apple Inc.에서는 작동 및 제품의 환경적 영향을 최소화하는 것을 책임으로 인식하고 있습니다. 추가 정보를 보려면 다음 웹 사이트를 방문하십시오. www.apple.com/kr/environment Apple dan Lingkungan Apple Inc. menyadari tanggung jawabnya untuk mengurangi dampak lingkungan dari operasi dan produknya. Informasi lebih lanjut tersedia di web: www.apple.com/environment

© Copyright 2026